Wednesday, October 28, 2015

A Fantastic Bargain Of A Meal

A meal of beef fajitas.
The most expensive part of putting on the Wednesday Community Meal is buying the protein. It's hard to find donations of lean meat. So typically each week, Trinity Episcopal Cathedral purchases it for the free-for-everyone weekly meal.

Of course, there's a budget that we need to stay within, so we shop sales and look for deals. We usually buy pork or chicken.  

Beef is the protein that rarely makes an appearance on our menu. But today was different. The best part: It was all free!

Our guests were able to enjoy homemade beef fajitas because of donations of high-quality beef from two of our wonderful community partners, Lift Urban Portland and Good Samaritan Hospital.

Lift Urban Portland donated two giant roasts; Good Samaritan Hospital gave us 40 six-ounce steaks.

We chose to make fajitas because we knew slicing the beef thin and adding peppers, onions and tomatoes would make it go farther, feeding more people.

After the beef fajitas, we served chili-topped baked potatoes, chicken skewers, meatloaf, ribs, chicken curry and ham. The latter was a gorgeous spiral cut ham from Whole Foods, donated by a Trinity parishioner.
A ham meal.

All of the proteins we served today were donated and helped us stay way under budget. Here's the breakdown: We spent $149.08 on ingredients for today's meal and served 398! That's soup, salad, entree, dessert and drinks for .37 cents a person! It was delicious, too.


Monday, October 26, 2015

Berry Swirl Macarons

These pretty Berry Swirl Macarons are filled with a lightly sweet raspberry/strawberry buttercream and tinted with fuschia gel coloring.

Besides drawing lines of the coloring on the inside of my piping bags, I also added a touch of the coloring to the meringue for sweet layered pink look.

Since I've discovered this marbling technique for macarons, I just want to keep experimenting with it since I so enjoy a baking/art project!

Here's the recipe:

Berry Swirl Macarons
180g ground almonds, sifted
270g powdered sugar, sifted
150g egg whites, aged 2 to 4 days in the fridge and then brought to room temperature
100g granulated sugar
Fuschia gel coloring

Line four heavy baking sheets with good quality parchment paper and set aside. Also, set aside two pastry bags for the piping of the macarons.

Sift together your ground almonds with the powdered sugar and set aside.

Whisk the egg whites (at room temperature) to glossy firm peaks adding the granulated sugar gradually in four parts. Tint with just a touch of the fuschia gel coloring.
The tinted meringue. I just used a touch of the fuschia coloring.
Incorporate the dry ingredients into the beaten egg whites using a large rubber scraper.  Mix well. 

Fold the mixture with the rubber scraper by pulling down the sides and flipping the mixture over. Do this until you have a smooth mixture that falls like a “ribbon” off the scraper.

Using a small brush, paint some stripes of fuschia gel coloring on the inside of the piping bags. Get the color all the way down to the tip but don't go crazy and use too much or you will have a mess. A little goes a long way.

Transfer the mixture into the two piping bags. Use rubber bands to close the piping bags.

The coloring on the inside of one of my piping bags.

A piping bag filled with batter.
Clip the tip of the bags, one at a time, and pipe small quarter sized rounds, leaving 1-inch of space between each because they spread as they set. Leave to set for about 30 minutes or until the top has formed a crust and is not sticky to the touch.
Piped macarons.

While they are setting, preheat the oven to 325 degrees. A convection oven is preferable.  Bake one sheet at a time in the center of the oven for about 10 to 12 minutes or until the cookie is firm, matte and doesn't wobble when touched. Leave on the baking tray until cool then lift them all off the parchment carefully. You may need to use a thin knife or spatula to help lift them off.

Sort into pairs and fill with Raspberry/Strawberry Buttercream.


Raspberry/Strawberry Buttercream
1/2 cup unsalted butter, room temperature
1/3 cup raspberry preserves
1/3 cup strawberry preserves
1/8 teaspoon sea salt

Whip the butter until it is light and smooth. Add the preserves and sea salt.

Whip this together until the filling is light and creamy. When you first start whipping the ingredients together, it will look like a curdled mess, but don't panic. The filling will eventually come together and be beautiful. Just whip it and whip it good! 

Filling the macarons

All done! Keep the macarons chilled until you are ready to serve them.


Saturday, October 24, 2015

Jack-o'-lantern Cookies


If you are a beginning cookie decorator looking for a simple design that makes use of multiple decorating techniques, Jack-o'-lantern cookies are for you!

There's some brush work, edible ink work and some segmented piping and it's all basic and easy to do.

To get started, bake mini pumpkin cookies and an equal number of larger base cookies and also have ready a black edible ink marker, a small "food only" brush, a batch of royal icing, gel colorings (I used orange, delphinium blue and moss green) and two pastry bags fitted with #2 tips.


Here's how to decorate them:

Start off by outlining and flooding the base cookies with white royal icing using one the pastry bags and a #2 tip.  Let the base cookies dry completely before moving onto the next step.

Once the base cookies are dry, mix up some blue royal icing and thin it to medium consistency. Drop about a teaspoon full onto the cookie and use your brush to spread it out evenly. It won't look perfectly smooth but that's the point, you want to add a textural look to the cookie.

After you have covered all of the base cookies, set them aside to dry. Reserve any leftover icing to use as "glue" when it's time to stick the cookies together.
Now it's time for the mini pumpkins, mix up a very small amount of medium consistency moss green royal icing.

Paint the stem of all of the pumpkins.

Mix up some medium consistency orange icing and place it a pastry bag fitted with a #2 tip. Following the curves of the cookie add orange to just the center segment. Do this to all of the pumpkins and let them dry for at least 20 minutes.

Add orange to the outside segments. This segmented piping adds so much texture and realism to the pumpkin. Let the icing dry completely before moving onto the next step.

Add a dollop of icing to back of the pumpkins and stick them onto the base cookies.

It will look like this.

Now for the fun part, get out your edible ink marker and turn the pumpkins into Jack-o'-lanterns.

Let the ink and the "cookie glue" dry completely before packaging.


Wednesday, October 21, 2015

Handmade Scarves


Volunteers Sam, Justine, Martha and Leah modeling scarves made by Chieko.
Guests at today's Wednesday's Community Meal at Trinity Episcopal Cathedral were gifted handmade scarves all lovingly knitted and donated by a wonderful woman named Chieko who is the mother of volunteer Nancy. 

It was such a generous gift and everyone enjoyed choosing their scarf from the large array of choices. It was so kind of Chieko to make them for our guests and I can't even begin to imagine the hours of knitting that she must have put in to make them.
Look at all of the scarves Chieko made! And that's not even all of them — there are more in the bag under the table. This photo was taken by volunteer J. Anderson who laid all of them out and oversaw their distribution.

We served 349 meals during our two hour service today and our entrees were also extra special because of a generous donation of chicken quarters and legs of lamb from Lift Urban Portland. Alongside the chicken and lamb, we served mashed potatoes and gravy and peas and carrots — Real comfort food that pleased our guests.

A baked chicken meal.

A roasted leg of lamb meal.


Tuesday, October 20, 2015

Double Decker Ghost Cookies

These double decker ghost cookies are a favorite of mine. They were quick to make and I think they're super cute too.

I cut the ghosts using a mini-cutter from a Halloween set that my mom gave me more than 15-years ago. No worries though, mini-cutter sets are still easy to find in stores today and online. Two stores where I've had good luck finding the sets are Michael's and Cost Plus World Market.

When making double decker cookies, my one tip is to cut the top cookies about half of the thickness of the base cookies— This just keeps the cookie from looking too bulky. The ghosts are 1/8-inch thick and the base cookies are 1/4-inch thick.

Here's how I made them:

Outline and flood base cookies and set them aside to dry completely.

Outline and flood ghost cookies with white icing and while the icing is still wet, drop on the eyes and mouth using black medium consistency icing and a #2 tip. Let the ghosts dry completely before moving onto the next step.

Once the base cookies and ghost cookies are dry, adhere them together using piping consistency royal icing as glue. A little goes a long way, so don't add too much or it will squish out and ruin the look. Use an edible ink marker to write "Boo!" and pipe a border.

Wait for the royal icing "glue" and border dry completely before packaging.


Thursday, October 15, 2015

Pomegranate Raspberry Macarons


A bottle of Pomegranate Raspberry preserves from St. Dalfour, the company that makes my favorite Black Currant preserves, is what inspired me to create these colorful and flavorful macarons.

I noticed the preserves at my neighborhood grocery store and couldn't resist buying them. What I love best about preserves from St. Dalfour is that they are not too sweet. There's no cane sugar used in making them and instead the preserves are sweetened with fruit juice concentrate.

To make the buttercream filling, all I did was whip the preserves into unsalted butter and add a pinch of sea salt. It really couldn't be any easier and the tartness of the pomegranate really comes through and helps contrast the sweetness of the almond shells.

For interest, I painted the inside of my pastry bags with stripes of red gel coloring for a marbling effect. I like this technique a lot but it also kind of stresses me because I'm not in complete control over how the design will turn out. There's no way to know what's going to come out of the pastry bag until you start piping. The color of these luckily turned out to be a pleasant surprise.

Here's how I made them:
Pomegranate Raspberry Macarons
180g ground almonds, sifted
270g powdered sugar, sifted
150g egg whites, aged 2 to 4 days in the fridge and then brought to room temperature
100g granulated sugar
Red gel coloring

Line four heavy baking sheets with good quality parchment paper and set aside. Also, set aside two pastry bags for the piping of the macarons.

Sift together your ground almonds with the powdered sugar and set aside.

Whisk the egg whites (at room temperature) to glossy firm peaks adding the granulated sugar gradually in four parts.

Incorporate the dry ingredients into the beaten egg whites using a large rubber scraper.  Mix well. 

Fold the mixture with the rubber scraper by pulling down the sides and flipping the mixture over. Do this until you have a smooth mixture that falls like a “ribbon” off the scraper.

Using a small brush, paint some stripes of red gel coloring on the inside of the piping bags. Get the color all the way down to the tip but don't go crazy and use too much or you will have a mess. A little goes a long way.

Transfer the mixture into the two piping bags. Use rubber bands to close the piping bags.
One of my filled piping bags, now I just have to clip the tip and start piping macarons.
Clip the tip of the bags, one at a time, and pipe small quarter sized rounds, leaving 1-inch of space between each because they spread as they set.

The macarons resting before baking.
Leave to set for about 30 minutes or until the top has formed a crust and is not sticky to the touch.

While they are setting, preheat the oven to 325 degrees. A convection oven is preferable.  Bake one sheet at a time in the center of the oven for about 10 to 12 minutes or until the cookie is firm, matte and doesn't wobble when touched.
The macarons after baking.
Leave on the baking tray until cool then lift them all off the parchment carefully. You may need to use a thin knife or spatula to help lift them off.

Sort into pairs and fill with Pomegranate Raspberry Buttercream.

Sorted macarons ready to be filled.
Pomegranate Raspberry Buttercream
1/2 cup unsalted butter, room temperature
2/3 cup Pomegranate Raspberry preserves (I used St. Dalfour brand)
1/8 teaspoon sea salt
Red gel coloring (optional)

Whip the butter until it is light and smooth. Add the preserves and sea salt.

Whip this together until the filling is light and creamy. When you first start whipping the ingredients together, it will look like a curdled mess, but don't panic. The filling will eventually come together and be beautiful. Just whip it and whip it good! Tint the buttercream with red gel coloring if desired.

Filling the macarons.

I'm really pleased with how these turned out but am already planning my next macaron creation. There just are so many flavor/color combinations that I want to try. Stay tuned.....

Wednesday, October 14, 2015

Tortellini For Everyone


Guests at today's Wednesday Community Meal enjoyed lots of pasta thanks to a donation of 12 cases of Buitoni Tortellini.

We cooked seven of the cases today and had plenty for everyone and even some leftover that we packaged up for our guests to take with them. One guest hollered out to me when he saw me in the dining room, "Hey Heidi, thanks for lunch and dinner!" I'm just glad that nothing went to waste. We froze the remaining five cases of tortellini and will utilize them in a future meal.

After boiling all of the pasta (Thank you Sam for taking on the tough task!), we tossed it in a homemade sauce filled with tomatoes, ground beef, sauteed onion, zucchini, artichokes, garlic and herbs. It turned out delicious and we received many nice compliments from our guests. Alongside the pasta we served garlic toast, roasted vegetables and melon. The bread for the toast was donated by Grand Central Bakery, the vegetables came from the Oregon Food Bank and the melon was gleaned from the recently opened New Seasons Market in NW Portland. 

It's always a surprise discovering what ingredients we have to work with and I'm grateful for the work of our gleaners and the donations we receive which help offset the cost of feeding hundreds each week.

Trinity Episcopal Cathedral has been so supportive and purchases any additional ingredients and supplies that we need to pull the meal together. It takes a lot of planning and work but everything always comes together thanks to our dedicated volunteers. We served 384 meals today.


Tuesday, October 13, 2015

From Scratch "Funfetti" Cake


You don't need to head to the store for a cake mix when you want make a colorful and celebratory "Funfetti" Cake.

Really, all you need is a good homemade cake recipe and a bottle of sprinkles and you are good to go.

I like to use my favorite vanilla buttermilk cake recipe and star sprinkles from Betty Crocker. The stars don't have a shiny coating like some sprinkles and melt nicely into the cake during baking.
My favorite sprinkles.
The result is a cake that's as pretty as it is delicious and trust me, you'll never want to go back to using a box mix. Oh and to make it even better, frost it with my easy to make Vanilla Cream Buttercream, it's not too sweet and very light and creamy.
My  two-tiered frosted "Funfetti" Cake chilling in the fridge.

Here are the recipes:

"Funfetti" Cake
(makes 2 8-inch cakes)

1 cup unsalted butter, room temperature
1 3/4 cups granulated sugar
4 eggs plus 2 egg yolks, room temperature
1 tablespoon vanilla extract
3 cups cake flour (It's easy to make your own cake flour, click here for the recipe)
1 tablespoon baking powder
1/2 teaspoon salt
1 1/2 cups buttermilk, room temperature
1 (1.25 oz) bottle sprinkles (I like star sprinkles from Betty Crocker)

Preheat oven to 350 degrees and grease and line 2 8-inch cake pans. In a large bowl, using an electric mixer, beat butter and sugar on high until light and fluffy, about 6 minutes.

Beat in the eggs plus egg yolks, one at a time, until combined. Beat in vanilla.

In another large bowl, whisk together flour, baking powder and salt. With mixer on low, add a third of the flour mixture to the butter mixture, beating to combine. Beat in 3/4 cup buttermilk, another third of the flour mixture, another 3/4 cup buttermilk, and remaining flour mixture until just combined. Scrape down the bowl as needed. Add the sprinkles and stir just until evenly distributed.

Divide the batter among the two prepared pans.  Bake for about 35 to 40 minutes in a 350 degree oven or until a toothpick inserted in the center comes out clean.

Let the cakes cool for about 5 minutes in the pan and then invert onto a cooling rack. Let the cakes cool completely before frosting.

Vanilla Cream Buttercream
1 cup milk
1 cup sugar, divided
1/2 cup heavy cream
1/3 cup cornstarch
1 1/2 tablespoons vanilla
2 cups unsalted butter, room temperature


In a saucepan over medium heat, cook the milk and half of the sugar until simmering.
In the meantime, in a small bowl combine the cream, the other half of the sugar and cornstarch. Mix well with a whisk.

When the milk is simmering,  pour about half of it into the cream mixture and whisk well. Add it back to the milk in the saucepan and heat, stirring constantly until the mixture becomes very thick.

Remove from heat and whisk in the vanilla. Put the mixture into a clean bowl and cover with plastic wrap. Let the mixture cool completely.


When the buttercream base is cool, transfer it to a mixer and whip until smooth, add the butter a tablespoon at a time and whip until light and fluffy.


Sunday, October 11, 2015

Kilt Cookies


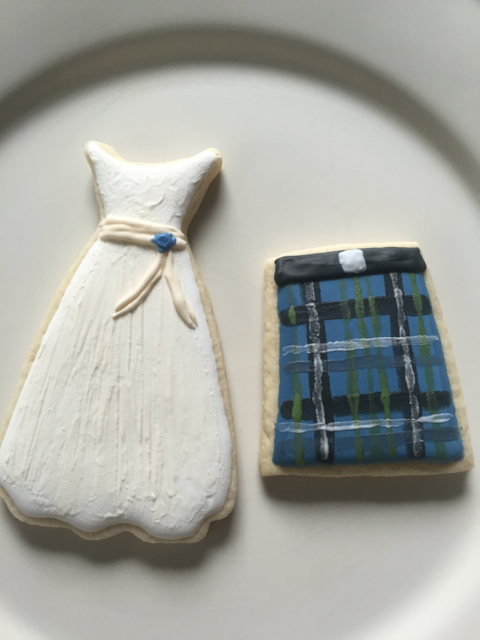
My friend Ginny asked me to make kilt cookies for a bridal shower and I'm so glad she did because I love a cookie challenge and I love baking for friends. The wedding dress cookies I made are also for Ginny and each of her guests will get one of each to take home.

It did take some time for me figure out how to create a plaid design on a cookie — At first I thought I could just pipe the lines but I then decided that method would look too bulky and not very realistic.  And, it would be very hard to pipe the lines thin enough and I was worried about smearing.

I also knew that I wanted the design to lay flat on the cookie, so my solution was to paint on the plaid using thinned royal icing and a very small brush.
Each of Ginny's guests will get an individually wrapped wedding dress and kilt cookie to take home.

Here's how I made them:
I used a 4-inch square cutter to cut the cookies and then trimmed the edges to make a trapezoid.

Cookies ready for the oven.

After baking, I outlined a cookie using flood consistency blue icing and a #2 tip.

And, I immediately filled in the cookie using the same icing and tip.

I used a scribe tool to evenly distribute the icing and gave the cookie a gentle shake to help the icing settle.

Once all of the cookies are outlined and filled, set them aside to dry completely. I let them dry overnight.

After the cookies have dried, paint on four lines of black using tinted and thinned royal icing and a small brush. Periodically clean off your brush by dipping it in water and patting it dry with a paper towel. Remember to make the lines perpendicular and not parallel to the sides of the cookie.

Once all of the cookies have the black lines added, mix up some thinned green royal icing and get ready to paint.

Add a line down the center.

Add a line on each side of the center line and a line outside of each of the black vertical lines.

Keep working until all of the cookies have five lines of green.


I then mixed up some thinned dark blue icing and added two horizontal lines on each side of the bottom black horizontal line. Do this to all of the cookies and let them dry completely.

Once the cookies are dry, it's time to add a final touch to the plaid. Paint white lines using thinned royal icing on top of the black vertical lines and add two horizontal lines above each of the dark blue lines.

Now it's time for a belt. Pipe two lines of medium consistency royal icing using a #2 tip.

Add more lines to fill it in. I purposely didn't use a scribe tool to manipulate the icing to flatten it since I wanted a textured look to the belt.

Add a belt to all of the cookies and let that dry.

Now for the very last step, using thinned white icing and a small brush, paint a buckle on the center of the belt. Let the cookies dry completely before packaging or serving.