Wednesday, November 25, 2015

Hot Lunches To Go

Leah and Kate were part of a small but great crew of volunteers who helped prepare and hand out the hot lunches today.
We served hot lunches to go at today's Wednesday Community Meal since Kempton Hall, where we usually serve, was being set up for tomorrow's Community Thanksgiving Meal.

Because it's been so cold here, it was important to us to still serve a hot meal that would warm our guests, so we made vegetarian chili, hot dogs and brownies.

Most of the beans that we used for the chili were donated by Shephard Chiropractic Clinic which recently held a canned food drive for us.

To the beans, we added zucchini, red onion, tomatoes, garlic, chili powder, cumin and a secret final ingredient — tofu! We received a donation two cases of silken tofu from Good Samaritan Hospital and it worked perfectly in the chili. It added lots of lean protein to the dish and no one even noticed it was there.

When I mentioned to one guest that there was tofu in the chili he wasn't fazed a bit and said, "That was so good, I hope you make it again."

We served 200 meals today.

Saturday, November 21, 2015

Baby Chocolate Pumpkin Bundt Cakes


Using the same chocolate pumpkin batter that I used to make whoopie pies, I made these baby bundt cakes. 

One recipe yields 18 cakes and they are a great size for sharing. I found that two cakes fit perfectly, side by side, in an inexpensive foil loaf pan, so you can safely deliver them with no worries about getting the pan back.

For an extra sweet touch, pipe a rosette of cream cheese buttercream.

Here are the recipes:

Baby Chocolate Pumpkin Bundt Cakes
(makes 18 cakes) 
1 cup dark brown sugar, packed
1 cup granulated sugar
1 cup canola
2 eggs
2 (15oz) cans pumpkin
2 teaspoons vanilla
3 cups flour
3/4 cup dark cocoa powder
1 teaspoon baking powder
1 teaspoon baking soda
1 1/2 teaspoons sea salt
2 teaspoons ground cinnamon

Grease your baby bundt cake pans and preheat the oven to 350 degrees. My pan is from Nordic Ware and makes six cakes. The recipe makes 18 cakes, so I used the same pan, repeating the process of greasing and filling it, two more times after baking the first batch.
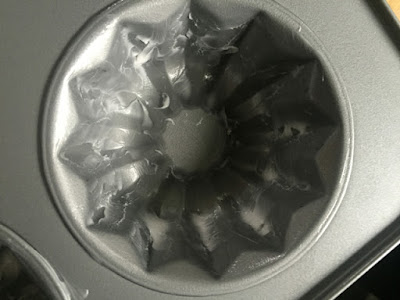
I greased the baby bundt pan with Crisco, being generous and careful to get it into every nook and cranny of every section.
In a large mixing bowl, whisk together the sugars, canola oil, eggs, pumpkin and vanilla.

In another large bowl, whisk together the remaining dry ingredients.

Add the dry ingredients to the wet ingredients and mix until well combined.

Fill the bundt cake sections 3/4 full with the batter and give the pan a firm tap on the counter to help the batter settle.

Bake the cakes for 20 minutes or until done and springy to the touch. Let the baked cakes cool for three minutes before inverting them onto a cooling rack. 

After they have cooled completely, frost them with vanilla cream cheese buttercream. I like to use a 1M tip and pipe a rosette on the top of each one.

Vanilla Cream Cheese Buttercream
(Note: this is the same recipe I used to fill the whoopie pies, but increased to make enough to top all 18 of the bundt cakes)
12 oz. cream cheese, room temperature
1 1/2  cups unsalted butter, room temperature
1 cup powdered sugar
1 1/2 teaspoon vanilla extract

Whip the cream cheese and butter together until smooth and creamy. Add the powdered sugar and vanilla and whip again.


Two cakes ready to be shared. They fit perfectly in a foil loaf pan.

Wednesday, November 18, 2015

Chop, Chop, Chop


Volunteers Leo, Helen and Steve worked nonstop in the dining room today.
Gosh it took a lot of chopping to prepare today's Wednesday Community Meal. I am so thankful for all of the volunteers who helped because we served one labor intensive lunch,  and it was a very busy day. We served 443 meals during our two hour service.

The line for the meal started forming early, just after 8 a.m. and by the time our doors opened at 11 a.m., it went all the way through the courtyard of Trinity Episcopal Cathedral and out to the sidewalk on NW 19th. I think everyone was just happy that there was a break from days of rain and anxious for the opportunity to sit and eat inside.

There just was so much prep work to be done. There was the bread that needed to be cut for the croutons, vegetables that needed to be chopped for the salads, oranges that needed to be sliced as a side and then there were the ingredients for our main dish.

We made a flavorful saute of Italian sausages, zucchini, onions, tomato and beans that we served over pasta and rice. The dish was our own creation, utilizing the ingredients we had on hand and we made enough of it to serve more than 400.

Just the chopping of the zucchini and onions took more than an hour and a half and for nearly an hour,  there were five volunteers in the kitchen just vigorously cutting the five cases of Italian sausages that were donated by Lift Urban Portland.

We topped our creation with shredded Parmesan.
The dining room volunteers and dishwashers worked nonstop too and deserve kudos. The Wednesday Community Meal really is a team effort and I know our guests are thankful for it.   


Tuesday, November 17, 2015

Mini Chocolate Pumpkin Whoopie Pies


The addition of pumpkin makes these chocolate whoopie pies extra flavorful and very moist.

There's also a few teaspoons of cinnamon and a good dose of sea salt in the batter which are nice compliments to the dark chocolate. The filling is just a vanilla cream cheese buttercream that's quick to make, light and not too sweet.

I also really like this recipe because there's canola oil instead of butter in the whoopie pie batter and it can be quickly mixed by hand. One batch yields enough cakes to assemble four dozen whoopie pies.

Here's the recipe:

Mini Chocolate Pumpkin Whoopie Pies
(makes enough cakes for four dozen filled pies) 
1 cup dark brown sugar, packed
1 cup granulated sugar
1 cup canola
2 eggs
2 (15oz) cans pumpkin
2 teaspoons vanilla
3 cups flour
3/4 cup dark cocoa powder
1 teaspoon baking powder
1 teaspoon baking soda
1 1/2 teaspoons sea salt
2 teaspoons ground cinnamon

Line sheetpans with parchment and preheat the oven to 350 degrees.

In a large mixing bowl whisk together the sugars, canola oil, eggs, pumpkin and vanilla.
Put the sugars, pumpkin, eggs, canola oil, and vanilla in a bowl.
Mix it until it is well combined.

In another large bowl whisk together the remaining dry ingredients.


The flour, cocoa powder, cinnamon, sea salt, baking soda and baking powder.
Add the dry ingredients to the wet ingredients and mix until well combined.

The batter is fairly thick.
Use a 1-inch scoop to drop mounds of batter onto the baking sheets, spacing them 2-inches apart. Use your fingertips to lightly flatten the mounds.

After dropping the scoops of batter onto the baking sheet, use your fingertips to lightly flatten the mounds.

Bake the cakes for 10 minutes or until done and springy to the touch. Let the baked cakes cool for a bit on the baking sheets before transferring them to a cooling rack.

Sort the cakes into pairs and fill with vanilla cream cheese buttercream.

Vanilla Cream Cheese Buttercream
8 oz. cream cheese, room temperature
1 cup unsalted butter, room temperature
2/3 cup powdered sugar
1 teaspoon vanilla extract

Whip the cream cheese and butter together until smooth and creamy. Add the powdered sugar and vanilla and whip again.

I like to support each whoopie pie with a mini muffin paper. Keep the pies covered in the refrigerator until you are ready to serve them.

Friday, November 13, 2015

Baby Deer Cookies

These baby deer cookies are the final tutorial from my woodland cookie set.

My friend Cindy warned me that the deer cutter that caught my eye on our field trip to Blake's Decorette Shop might not be the best.

"It looks like it would be hard to get the dough out of those thin legs," she said.

I ignored reason and bought the cutter anyways because it was so darn cute, but Cindy was right. The thin legs were a big pain!

Patience, very cold cookie dough and the use of a small soft paint brush to easy the dough out of the cutter worked but gosh, I'd hate to make more than a dozen of these.

Luckily the decorating went smoothly. Only three colors were needed,  just brown and a small amount of white and black. And, brown was the only color that I needed a piping bag for. I applied the white and black details with a paint brush and scribe tool.

Here's how I made them:

Be patient and cut and bake your cookies. I couldn't have gotten the dough to release without applying some pressure from the brush. As you can see this leaves a few marks on the legs of the deer but these won't be noticeable after decorating.


I outlined and filled the cookie with brown icing using a pastry bag and #2 tip. Then I immediately added some small drops of thinned white icing using a scribe tool. Just touch the icing with the tip of the scribe and then touch it onto the deer's back. I let this dry completely before moving onto the next step.

Using white icing and a small brush add white to the tail, hooves, ears, chest and eye area.

Use the scribe tool to add a black nose, eye, lashes and lines on the bottom of the hooves. While the eye is still wet, use the scribe add the tiniest drop of white.

Thursday, November 12, 2015

Woodland Tree Cookies

These Woodland Tree Cookies were inspired by the late oil painter Bob Ross and the hundreds of trees that I watched him bring to life with his brush on his long running PBS show, "The Joy of Painting."

Bob's "happy trees" were just the trees I imagined in a magical woodland brimming with beauty, peace, joy and gnomes.

Now I am not a painter, but Bob's motto, "there are no mistakes, just happy accidents" is something I try to always remember and encourages me to not let a fear of failure hold me back.

As a college student, I religiously watched the "The Joy of Painting." It was on Sundays, early in the afternoon, and it was a relaxing end of the weekend ritual. Watching Bob paint was meditative and made me feel positive and ready for the upcoming week.

I never painted alongside Bob, I just sat and absorbed his creations and his sweet and wise narrative.

So, with tinted and thinned royal icings as my paint, and flooded and dry cookies as my canvas,  I made these woodland tree cookies.

Some are better than others since as with just about everything, practice makes perfect. But, I wasn't afraid to try and I hope Bob would be proud.

Here's my inspiration:

 And,  here's how I made them:

Make some cookies and outline and flood them with white icing. Let them dry completely before painting the trees.
I mixed a paint by tinting thinned royal icing with a bit of moss green and leaf green gel coloring.

Paint a line to mark the center of your tree.

Now load your paint brush and starting at the top fill in the branches and work your way down making the tree wider as you go.

Then go back and add some darker areas for dimension.

You can also add some brown royal icing paint to mark the trunk, branches and ground.

If you want to make a group of trees just make the one in the foreground bigger and darker.

Keep practicing and experimenting. This was one of my favorites.


Wednesday, November 11, 2015

Warm Bread


Today we served 340 lunches at Trinity Episcopal's Wednesday Community Meal and the highlight of of every plate was warm, just baked bread.

The bread was donated to us by Good Samaritan Hospital and came par baked and frozen. The hospital gave us three cases and it was so simple to prepare. All we had to do was bake it for 5 minutes in a 350-degree oven and voila! — fresh bread!

As the one who in the past has made bread dough from scratch for the meal, I can't even begin so say what a convenience this was.

In the hopes that we could get away with serving the bread without butter, we topped it with a bit of cheese, minced garlic and parsley before baking. Our plan worked and the guests loved it.

One man came up to the window as he was leaving and asked if he could have some more bread to go. When I handed it to him he said, "oh my,  it's still warm," and gave me the biggest smile.

Warm bread is spirit lifting and was exactly what our guests needed on this damp Portland day.


Monday, November 9, 2015

Gnome Cookies


I like my gnome cookies but they also turned out to be one of the most labor intensive cookies I've ever made.

And, after all the work, I have to report that there was a sad casualty. You see, I was so pumped with how they turned out that I lined them up for a final photo and in my excitement, dropped my camera on one of the poor guys. He was pretty messed up and sadly there was no way to resuscitate him.

With a good 40 minutes devoted to decorating each gnome, I'd have to say these are cookies you should make for the experience or for very very good friend. With the time spent on them, I'd have to charge $15 a cookie if I sold them and I can't imagine anyone would want to pay that.

If you want to make each kind of cookie from my woodland set, make extra mushrooms and just a handful of these little guys.

Here's how:

I knew it would be all in the details when it came making the gnome cookies come to life. Before I started decorating, I traced my cutter and sketched multiple designs on paper. I always find my results are better if I have a solid decorating plan on paper. Trust me, it's time well spent.

I started by outlining and flooding the hats.

Then I outlined and flooded the boots and used an edible ink marker to break up the face, shirt and pant sections and draw where I wanted the gnome's hands to be placed.

I added the face and hands. As you can see, I decided to move the placement of the hands down a bit.

Then I outline and flooded the pants, going around the hands so that that they look like they are inside pockets.

Outline and flood the shirt.

Add the eyes, eye brows and beard with white icing.

White the white icing is wet, add the ears and nose. Let this dry completely before moving on.

Once the icing is dry, use a brush and thinned icing to add details — black above the eyes and for the mouth; a bit of pink to highlight the cheeks, ears, nose and mouth; and more skin colored icing under the eyes and on the ears and under the mouth.

I used a brush and thinned black/blue icing to add details to the shirt and mark the gnome's arms.

The addition of two tiny drops of blue on the eyes brings the gnome to life. I used a scribe tool to add it.

Now it's time for some textured details on the pants and hat, again using thinned icings and a small brush. As you can see, I decided to bring the hat down farther on the gnome's head and covered its original eyebrows.

I also brushed on some darker brown icing on the boots.

Now it's beard detail time —  Using piping consistency icing and a #1 tip, add strands of hair.

Also add piped hair to the mustache and add new eyebrows.

Looking good!

Saturday, November 7, 2015

Woodland Mushroom Cookies


Of all the cookies in my woodland set, these mushrooms took the least amount of time. I could have easily made more of them and trust me, I don't feel that way about too many cookies.

For the smaller mushroom, I just outlined and flooded the stem with white icing and outlined and flooded the top with red. While the red icing was still wet, I immediately dropped on small and large dots of white icing.

For the large mushroom, I outlined and flooded the stem with white icing and the top with brown. Then, I let that set for at least 30 minutes before adding detail with some piping consistency ivory icing.

I could have stopped there, but decided to add some green grass at the base of the mushrooms after the icing dried overnight. As paint, I used thinned green icing and I applied it with a small soft brush.

Here are more details:
Outline and fill the stem.

Outline and fill the top and have your white icing ready for dropping on the dots.


For the large mushroom, I outlined the stem with white icing and the top with brown. Then I let the icing dry for 30 minutes before adding details with ivory piping consistency icing and a #2 tip.  With the ivory icing, I outlined the stem and then piped some lines for the gills.


I let the mushroom cookies dry completely before I added the grass at the base.

For the grass I painted on thinned royal icing using a small soft paint brush. I tinted the icing with leaf green and moss green gel coloring.

All done!