Showing posts with label holiday cookies. Show all posts

Tuesday, December 22, 2015

Gingerbread Wreath Cookies


I have to credit my #65 Wilton leaf tip for these cute and realistic looking gingerbread wreath cookies. Making them isn't hard at all, it just takes some time. The real trick is just piping the leaves in random directions, making their placement look as natural as possible.

These make great Christmas tree ornaments and can be enjoyed year after year if you carefully box them up after the holidays. Keep them wrapped in tissue paper and nice and dry.

Here's how to make them:
Bake some round gingerbread cookies and be sure to make a hole in the dough before baking if you want to turn them into ornaments.

Outline a wreath shape with white icing.

Immediately fill it in and use a skewer or scribe tool to help evenly distribute the icing.

Give the cookie a gentle shake to help the icing settle and set it aside to dry completely before moving onto the next step.

When the cookie is dry mix up some stiff green icing and place it in a pastry bag fitted with a small leaf tip. I used a Wilton #65. Start piping leaves, working your way around and trying to make their placement as natural as possible.

One done, more to go!

Once the leaves have dried for at least 15 minutes, you can pipe on some small red berries using medium consistency red icing and a #1 tip. Let the cookie dry completely before threading twine or a small ribbon through the hole.
Once I got going with my leaf piping,  I found it hard to stop!

Cookie closeup.

Tuesday, December 15, 2015

Ornament Cookies


I used just three colors of royal icing to make these ornament cookies and was still able to create a wide assortment of designs. I decorated all of these using the wet on wet technique of dropping wet icing onto wet icing for a flat design.

There are two main reasons I like using the wet on wet technique. One is that it's quick decorating because there's no added drying time between layers. And two, is that a single flat layer of icing is the sturdiest and a smart choice for holiday cookies that will packaged or shipped. A single layer of icing holds up best because there are no raised bits that can be squashed or knocked off.

Here's how I decorated them:
I mixed up all of my icing colors, thinned them to flood consistency and placed them in piping bags fitted with #2 tips. I used just three colors, blue, green and white.

When you decorate using the wet on wet technique you can work on just one cookie at a time.

Outline and fill a section of the cookie with white.

Use a skewer or scribe tool to help evenly distribute the icing and give the cookie a gentle shake to help the icing settle.

Immediately add two blue stripes.

Add a green stripe.

Now outline and fill the other sections of the cookie.

If you don't decorate the entire cookie while the icing is still wet, you'll have obvious seams between the segments.

One down, more to go.

You can also divide up the segments on the cookie differently.

Remember to always give the cookie a gentle shake to help the icing settle and help eliminate air bubbles.

Add some dots while the icing is still wet.

Finish off the cookie with some blue on the top and bottom.

You can also draw through piped lines for a chevron effect.

This is so simple yet people are always amazed by it.

Three cookies down.

Here are two more design ideas. Experiment, be creative and most importantly, have fun. Let the cookies dry completely before serving or packaging.


Friday, December 11, 2015

Snowman Cookies


The snowmen on these cookies were piped freehand onto an iced and dry base cookie.

I like cookie designs that don't require the purchase of a special cutter. I chose to use a plaque cutter for these but a simple round or square would work well too.

Because they were made freehand, every single snowman is a little bit different which I think makes them interesting and injects them with some personality. I got a kick out of piping their stick arms in different poses.

These cookies were decorated in four steps and need drying time in between. They aren't hard to make, they just take some time.

Here's how:
Outline and flood a cookie with light blue icing and then immediately pipe on some white dots for snow. Set the cookie aside to dry completely. Keep working until all of your cookies have this base coat.

Once your base coats are dry, pipe on a snowman with medium consistency white icing. Use your scribe tool or a skewer to move the icing to fill in the gaps and give the cookie a gentle shake to help the icing settle.

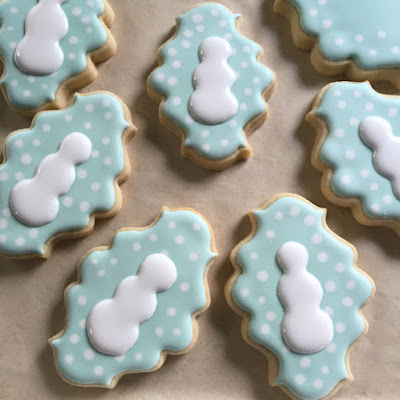
Repeat until there is a snowman on every cookie and set them aside to dry completely.

Once your cookies are dry, pipe on three dots of piping consistency icing and have a small food safe brush ready to use. (I apologize for the bad lighting, I was working late into the night.)

With the brush, spread the icing neatly out to the edges of the snowman working in a circular motion so that it looks natural. Set the cookies aside to dry completely.

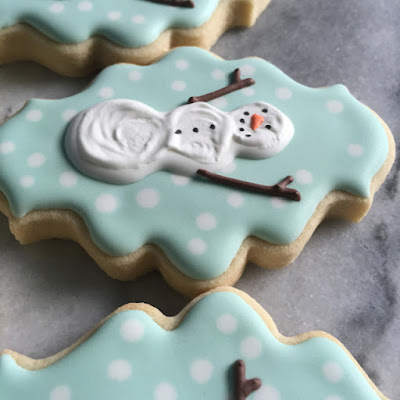
The final step is to use a black edible ink marker to add eyes, a mouth and buttons. Also, with piping consistency brown and orange royal icing add the arms and carrot nose. For the nose, I used my scribe tool to help manipulate the icing to a point.
All done!

Once the cookies are completely dry they can be packaged. I put each cookie into a self-sealing cellophane bag.


Tuesday, December 8, 2015

Gingerbread Trees

When you decide to go into decorated cookie mass production like I have this past week — I made and packaged more than 300 — It's imperative that you pick a doable design that's simple.

Because if you don't, and I've learned from experience, you will drive yourself absolutely crazy and the decorating will be tedious. And, intricate designs have a real tendency to look messy when you combine decorating with feeling overwhelmed.

Now simple doesn't mean boring or basic as these gingerbread trees prove. A simple cookie can still look very special with a smart design. I think these actually turned out quite elegant and the best part is that I accomplished a lot and enjoyed the process.

Here's how:
Make a batch of gingerbread trees. Click here for the recipe that I use.

With flood consistency royal icing and a #2 tip, outline the cookie.

Using the same icing and tip, immediately flood the cookie.

Use a skewer or scribe tool to help evenly distribute the icing and give the cookie a gentle shake to help the icing settle. Set the cookie aside to dry.

Let your cookies dry completely before moving onto the next step.

With medium consistency icing and a #2 tip, add the swirl details starting at the top left of the tree and working your way down the cookie. Medium consistency means icing that holds its shape but also settles and doesn't leave a peak. If you look at the design, it's just two linked capital cursive "L's" and very simple. It's a good idea to practice the design by first piping onto a plate so you get it just right before you go for it on a cookie.

Let the cookies dry completely before serving or packaging.


Monday, December 7, 2015

Gingerbread Lollipops

I chose to make these gingerbread lollipops for a recent fundraising sale at church because they are what I call a simple showstopper — Attention getting, yet quick to make.

The sticks that I used are candy apple sticks which take the heat of the oven and have a semi-pointed end that's easy to insert into the cookie.

Really, the only real trick to making these is to cut your cookies extra thick to accept the stick and then it's just two color wet-on-wet decorating and some basic packaging.

Here's how I made them:
Cut gingerbread rounds thicker than the diameter of the sticks you want to use.  Insert a stick into each cookie, pressing gently until it's more than half-way through it. Check the back of the cookie and if you see thin areas, you can press in a bit of extra dough for support.

Place the cookies on a parchment lined baking sheet and bake.

To decorate, add a touch of royal icing at the base of the cookie for extra support and then outline and fill the cookie. Immediately pipe on a spiral of another color and that's all there is to it. Leave the cookies to dry completely at room temperature.

Once dry, the cookies are super sturdy and easy to pick up.

I wrapped the gingerbread lollipops for the fundraising sale by clipping the adhesive strip off of a self-sealing cellophane bag and sliding it over the cookie. Then, I tied on the bag with a piece of ribbon and that's all there is to it!