Showing posts with label how to decorate sugar cookies. Show all posts

Thursday, March 31, 2016

Dipped Marbleized Cookies


I really wish I could, but I can't take credit for the clever marbleizing technique I used to create these colorful cookies.

The genius behind it is decorator Meghan Rosko who generously shared it on her YouTube channel. She also has a website called Nutmeg and Honeybee.

Besides the look of these cookies, I love how quick it was to decorate them. In just 10 minutes, I had two dozen cookies done and I didn't have to use a single pastry bag!

The cookies are decorated by dipping them into thinned royal icing that has food coloring painted on the surface. These were so much fun and I can't wait to experiment some more.

To decorate cookies, first soak some paint brushes in water. Then thin to flood consistency in a bowl some white royal icing and squeeze out your gel colors of choice onto a plate. I used moss green, cornflower blue, teal, ivory and rose.

Add strokes of the color to the top of your royal icing. Be sure to dip your brush in water to clean it off between colors.

Dip the cookies one at a time into the icing, holding your fingers back and just coating the top. Swirl and shake the excess icing off, still holding the cookie upside down. Place the cookie icing side up on a sheetpan to dry. Repeat, adding more gel coloring to the icing as needed. I found that I could get three cookies dipped before needing to add more color. Let the cookies dry completely before serving.

Saturday, June 21, 2014

Colorful Dot Cookies


These colorful dot cookies are a perfect project for first time cookie decorators. You'll get lots of practice outlining and filling cookies with royal icing and you'll get some cute cookies in the end.

The secret to success is using flood consistency royal icing that isn't too thin. These dot cookies are small at 1.5 inches in diameter, and if your icing is too thin it will be hard to control and want to run down the sides of the cookie. Aim for 15 second icing which is icing that settles into place in 15 seconds after drawing a line through it with the back of a spoon.

Another tip is to take your time choosing colors. These cookies are simple so you want pleasing colors that look good together. I chose complimentary pastel shades of green, blue, yellow and pink mixed using electric colored Americolor gel pastes.

Here's how to decorate them using the 15 second flood icing and a #2 pastry tip:

Outline the cookie.

Immediately fill the cookie.

Use a skewer or scribe tool to help evenly distribute the icing and give the cookie a gentle shake to help the icing settle.

Keep working until you have decorated all of the cookies. Let the cookies dry completely before serving or packaging. This usually takes about 8 hours depending on the humidity.

Thursday, February 6, 2014

"Owl" Always Love You


When I showed my daughter Eleanor these "Owl" Always Love You cookies for Valentine's Day she said, "I'm going to be honest. It's sweet but it's also kind of corny."

I like corny.

The idea for these came about as I was digging for my "Bee" cutter for my recent batch of "Bee" Mine cookies. I came across the owl cutter and knew I wanted to figure out a way to incorporate it into a Valentine cookie.

I used the cutter to stamp an outline onto a plaque shaped cookie before baking so that when it came to decorate all I had to do was trace the lines.

After outlining and flooding the cookie with white royal icing and filling in the owl body with pink, I added some feather detail, big eyes and the message using medium consistency fuschia colored icing.

Here's how:
While the pink icing is still wet, add a few lines.

Use a skewer to swipe down through the lines twice on each side. Be sure to wipe your skewer off after each swipe.

Also add two black curved lines down the middle of each owl. Let the cookies dry before moving onto the next step.
Add your lettering and two white dots with a black dot dropped on top for eyes and a yellow beak. Let this dry before drawing larger icing circles around the eyes and filling them in.
Also add some squiggles to the breast of the owl. Let the cookie dry before packaging.


Monday, November 11, 2013

Flood Consistency Royal Icing

The real secret to successful cookie decorating is having the proper consistency of royal icing for your decorating techniques. And, the most used is flood consistency royal icing for outlining and filling cookies.

So, as I was getting ready to flood a recent batch of sugar cookies I thought I'd make a quick video to help show you flood consistency royal icing - it's icing that's thick enough to not run all over the sides of the cookies yet thin enough to spread out into a nice even coat.

I hope this short video helps:


Saturday, September 14, 2013

Just For Fun Cookies


My good friends Shinobu and Rieko came over yesterday to see my new kitchen and decorate cookies with me just for fun.

The day before, I baked up a batch of sugar cookies that I cut in different shapes. Then my friends and I made royal icing together and tinted it in a variety of colors.

It was "relaxed decorating" because we enjoyed experimenting with different icing techniques and not feeling any pressure because the cookies were just for us.

Having the correct consistency of royal icing when you are decorating cookies makes all the difference and the only way to figure this out is by practice. I also hinted to my friends that I'm hoping to recruit them when it's time to decorate snowflake cookies for the annual Christmas cookie sale to benefit the Wednesday Community Meal.

Cookie decorating is always more fun when you are with friends.

A heart decorated using the simple "wet on wet" icing technique. Fill and flood a cookie with white icing using a #2 tip and quickly drop colored dots of icing using a #1 tip.


A scalloped chevron heart made by piping a white border and then filling and flooding the cookie with pink icing. While the icing is wet, draw lines of white icing across the heart and quickly use a skewer to draw through the icing lines to create a chevron effect.

A simple scalloped heart made by outlining a border with piping consistency icing using a #1 tip. Piping consistency icing is the texture of toothpaste. Let the border dry and then flood the cookie with another color of icing. Use a skewer to ease the icing to the edges of the border.

A pretty cupcake cookie made by flooding  the cookie with white icing for the paper and pink for the cake. Add some cute sprinkles to the pink cake part. Let the icing dry for about 15 minutes before piping lines for texture on the paper and swirls for texture on the cupcake. Because the flood icing wasn't completely dry, the details melted a bit into it for a soft textured look. If you want your details to look sharper, add them after the flood icings are completely dry.

A simple chevron pattern that is striking yet so easy to make. Food the cookie with white icing and immediately pipe lines in alternating colors across the cookie. Use a skewer to drag down, up and down through the lines, wiping it clean after each swipe.

Sunday, April 7, 2013

Red Doors Of Trinity In Cookie


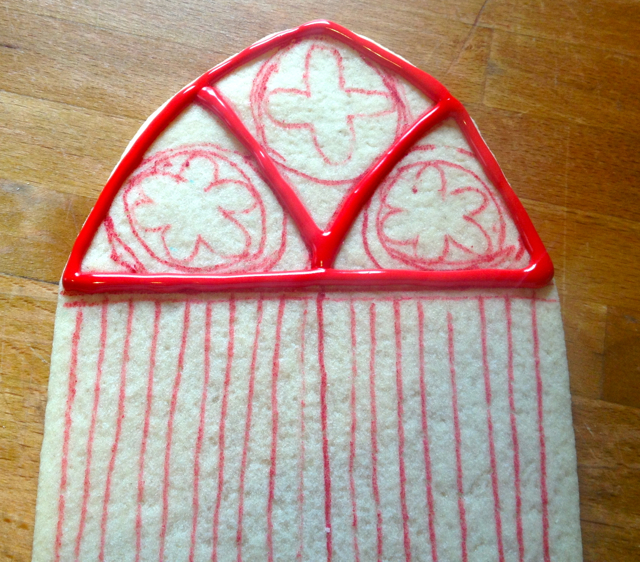
The focal point of Nathan's wedding cake were the red doors of Trinity Episcopal Cathedral made out of sugar cookie dough. 

Nathan is a priest at Trinity so I wanted to incorporate the church somehow into the design of the cake and a colorful pop of red is always a good thing.

Here's how I made them:

I sketched the design.

I cut the shape I wanted out of cardboard and then used it as a guide to cut the door out of sugar cookie dough.

After baking the cookie I used an edible ink marker to outline my design.

Then it was time to start icing.

There are wood slats on the front of the doors so I piped straight lines with a space in between. Once the first set of lines dried I went back and added more lines for a textured look.

Looking pretty good.

I used a #1 pastry tip to add the black details.

I let the cookie dry completely before going back and adding yellow icing to the light.

I used a dab of buttercream on the back of the cookie to stick it into place.


Tuesday, April 2, 2013

Tree Cookie


Thanks to my wonderful #67 leaf tip, this tree cookie actually isn't too hard to make.

If you haven't used a leaf tip before, practice piping on a plate until you get the hang of it. The secret is to pull up as you release pressure on the pastry bag. That movement is what forms the end point of the leaf. It just takes some practice.

These trees are for the wedding cake I'm making this weekend so I "carved" the initials of the couple into the trunk of one of the trees.

Here's the steps to making them:
Make and bake tree cookies.

After you've flooded the trunk with brown and the top with green royal icing, let the cookie dry completely. Then, begin adding branches with piping consistency royal icing and a #2 tip.

Try to make the layout of the branches look natural.

With stiff icing and a #67 leaf tip, add green leaves.

Add more leaves in another color for contrast and interest.

Sunday, March 10, 2013

Clover Cookies


Calling all beginning cookie decorators: These clover cookies are for you.

No special cookie cutters are required and all you need are two colors of royal icing.

They are super easy to make and the results are satisfying. And, with St. Patrick's day under a week away, how can you resist? Please give these a try.

Here's how to make them:
Outline a cookie.

Fill the cookie with flood consistency icing and use a skewer to help move it to the edges.

While the flood icing is wet, drop three drops of flood consistency green icing onto the cookie.

Starting at the top of each drop, use a skewer or toothpick to draw through the drop and down to create a stem. Wipe the toothpick or skewer clean after each swipe.


Tuesday, February 5, 2013

Dogwood Cookies

I can think of a lot of occasions these pretty Dogwood cookies would be suited for....

Valentine's Day
A Tea Party
A Baby Shower
A Wedding Shower
A Spring Wedding
A Little Girl's Birthday Celebration
A Spring Festival

And, they are not too hard to make. The Dogwood is one of most basic flowers to create because it's just four petals and some tiny piped dots for the centers.

I'm going to wrap these cookies up and sell them this Sunday, February 10 in a Valentine's Treat Sale at Trinity Episcopal Cathedral. The sale is a fundraiser for the Wednesday Community Meal.

Also available for purchase will be hand-dipped Belgian chocolate truffles. All of the the treats will be beautifully wrapped and ready to give. The sale will be in Kempton Hall from 9 a.m. to noon.

Here's how to make the Dogwood Cookies:
Outline the cookies with piping consistency light pink icing.

Flood the cookies with a darker pink flood consistency icing. Use a skewer or toothpick to ease the icing to the edges.

Let the cookies dry completely before moving onto the next step.

With a dark brown icing that is piping consistency, pipe branches onto the cookies (see the cookies in the back of the photo). Let the branches dry before adding the flowers.

With a reddish pink icing that is the consistency of sour cream, pipe four petals on the ends of the branches. Use a brush to ease the icing towards the center. You don't want the petals to be completely filled. You still want to see the flood icing underneath in areas.

Pipe little lime green dots in the center of the flowers using a #1 tip and piping consistency icing.


Friday, September 14, 2012

Bee Sugar Cookie


I finished decorating my bee sugar cookies today and I'm pleased with how they turned out. I especially like how the brushed embroidery technique added a lacy look to the wings.

Initially I had planned on using a darker yellow for the body of the bee but decided to use a softer hue to better compliment the wing color.

I also decided to make some simple brushed embroidery flower cookies to go with the bees. I think they look sweet together.


Here's how to make them:

Bake a batch of bee cookies.

Make royal icing and color it for the base of the wings. I used a tiny amount of Lemon Yellow and Chocolate Brown to make it cream colored. Thin the icing with a bit of water to make it "flood consistency" and put it in a piping bag with a #2 tip.
Outline and flood the wings. Let this completely dry before moving onto the next step.
I used a bit of Royal Blue and Super Red coloring to make a soft lavender color for the wing detail. Keep this icing stiffer for your brushed embroidery. Put the icing in a pastry bag with a #2 tip. Also get your square tip brush ready and fill a small cup with water.
Outline the wing and use your square tip brush to gently pull the icing inward. Work around the whole wing.
It will look like this.
Tint some icing yellow and thin it to "flood" consistency. Also get a small amount of black icing ready that is the same consistency. Put the black icing in a bag with a #1 tip. You will need have it ready to use right after this step. Outline the body of the bee and fill it in.
With your black icing make three stripes and two dots for the eyes. Looking good!
Here's a close up of the easy brushed embroidery flower cookies I made at the last minute. Be sure that your base coat is completely dry before attempting brushed embroidery.
Keep working until you are done. I like to put on some music and enjoy the process. Please don't stress out — Just have fun.
After the cookies are completely dry they can be packaged for giving.