Thursday, April 11, 2013

Raspberry Filling


I'm making a birthday cake for a chocolate raspberry fan this weekend.

My plan is to make a few layers of the "Greatest and Easiest Chocolate Cake" and fill them with this homemade raspberry filling.

I much prefer making my own cake fillings as opposed to buying them or using jam because then I can control the sweetness and they taste fresh and so much better.

After I fill the cake, I'm going to coat it with Swiss meringue chocolate buttercream and I'll definitely share the results.


Raspberry Filling
1 12 ounce bag frozen raspberries
1/2 cup sugar
1/3 cup heavy cream
2 tablespoons cornstarch

Heat the frozen raspberries and sugar in a saucepan over medium heat until simmering. Keep a watch over them and periodically give them a stir.

In a small bowl whisk together the cream and cornstarch. When the raspberry mixture is simmering, add the cream mixture and whisk constantly over medium heat for two to three minutes until the mixture thickens. Remove from heat and let cool completely before using.


Wednesday, April 10, 2013

A Variety Of Dishes

Many different dishes were served today at the Wednesday Community Meal at Trinity Episcopal Cathedral and they were all well-received by our guests.

We rely on gleaned food to help us stay within budget and that means we don't have much control over what we get. We are just thankful to have ingredients to use and always try our best to put them together in a way that is tasty and appealing.

Here are a few of the 257 meals that we served today:
Stuffed chicken with gravy, rice, asparagus, foccacia and strawberries.

Barbecue ribs, rice, asparagus, strawberries and garlic toast.

Mexican chicken over Spanish rice, foccacia and strawberries.

Pasta with sausage and onions, foccacia and strawberries.
 The first dish that went out was the pasta. We made eight hotel pans of it and within 40 minutes it was gone and time to move onto the next item. Rapidly changing what we serve keeps us on our toes and keeps things interesting. We have a wonderful volunteer team and we work well together.
Adding the sausage and sauce to hotel pans before adding the pasta.

There would be no community meal without our dishwashers Bill, Brad, Dave, Steve and Jay (not pictured). With good spirits and a sense of humor they work pretty much nonstop. They are simply the best.


Tuesday, April 9, 2013

Vanilla Bean Strawberry Macarons


These pretty vanilla bean strawberry macarons came about because I had some leftover strawberry buttercream and lots of egg whites from my wedding cake baking extravaganza.

Strawberries and vanilla go so well together. I always add vanilla to the strawberries when I'm flavoring the topping for shortcake or angel food cake.

There is no color added to the macaron shells, just the seeds from one whole vanilla bean. I like the look of seeing the black flecks of the vanilla seeds in the creamy colored shell.

The buttercream is made with fresh strawberries and is not too sweet. I had 1/2 a cup of strawberry buttercream leftover but needed more to fill all the macarons so I added one package of cream cheese and gave it a whip. I didn't add any additional sugar.


Vanilla Bean Strawberry Macarons
180g ground almonds, sifted
270g powdered sugar, sifted
150g egg whites, aged 2 to 4 days in the fridge and then brought to room temperature
100g granulated sugar
Seeds of one whole vanilla bean


Add the vanilla seeds to the granulated sugar and set aside.

Line four heavy baking sheets with good quality parchment paper and set aside. Also, set aside two pastry bags for the piping of the macarons.

Sift together your ground almonds with the powdered sugar and set aside.

Whisk the egg whites (at room temperature) to glossy firm peaks adding the granulated sugar gradually in four parts.

You'll be able to see the vanilla seeds in the egg whites.


Incorporate the dry ingredients into the beaten egg whites using a large rubber scraper.  Mix well. 
Fold the mixture with the rubber scraper by pulling down the sides and flipping the mixture over. Do this until you have a smooth mixture that falls like a “ribbon” off the scraper.

Transfer the mixture into the two piping bags. Use rubber bands to close the piping bags. Clip the tip of the bags, one at a time, and pipe small quarter sized rounds, leaving 1-inch of space between each because they spread as they set.

Piped macarons resting before baking.


Leave to set for about 30 minutes or until the top has formed a crust and is not sticky to the touch.
While they are setting, preheat the oven to 325 degrees. A convection oven is preferable. 

Bake one sheet at a time in the center of the oven for about 12 minutes or until the cookie is firm, matte and doesn't wobble when touched.
Leave on the baking tray until cool then lift them all off the parchment carefully. You may need to use a thin knife to help lift them off.

Sort into pairs and fill with strawberry filling.

Fresh Strawberry Filling
2 cups diced strawberries
1/4 cup sugar
1 package (8 oz) cream cheese, room temperature
1/4 cup unsalted butter, room temperature
1 teaspoon vanilla

In a saucepan, combine strawberries and sugar. Cook over medium high heat until it comes to a boil. Reduce the temperature and simmer for 5 to 7 minutes or until the mixture is thick and the strawberries begin to fall apart. Use a fork to break up the strawberries even more.

Transfer to another bowl and let cool completely. You can refrigerate the berries to speed up the process.

In stand mixer, whip the cream cheese and butter until light and fluffy. Add the strawberries and vanilla and whip again until fully incorporated. You may need to chill the filling to firm it up before piping between the macarons.

Use a piping bag to fill the macarons. 

Use a piping bag to fill the macarons.

Monday, April 8, 2013

More Wedding Photos

The room ready for the reception. Thank you Cindy for taking the photos. It was an exciting day.


Side view of the wedding cake.

Cheryl adding the fresh roses to the cakes.

Trees and blue birds made from sugar cookie dough and decorated with royal icing are colorful additions to the cake.

Cheryl adding birds to the cake.

Cheryl and I discussing bird placement on the cake.

Adding the tree cookies to the cake. I think I look positively obsessed and I think my friends Cindy and Cheryl would agree. They were so supportive and helped me stay calm.
It takes a team to make punch.  Martha is in the back opening the 7-up and my daughter Una, Leah and Jordan are mixing it up. I'm adding mint and fresh raspberries. The clear punch was made with 7-up, white grape juice, white cranberry juice and soda water.  It was light, crisp and tasted like champagne. A white grape juice ice ring made in a bundt cake pan helped keep the punch chilled.

Sunday, April 7, 2013

Red Doors Of Trinity In Cookie


The focal point of Nathan's wedding cake were the red doors of Trinity Episcopal Cathedral made out of sugar cookie dough. 

Nathan is a priest at Trinity so I wanted to incorporate the church somehow into the design of the cake and a colorful pop of red is always a good thing.

Here's how I made them:

I sketched the design.

I cut the shape I wanted out of cardboard and then used it as a guide to cut the door out of sugar cookie dough.

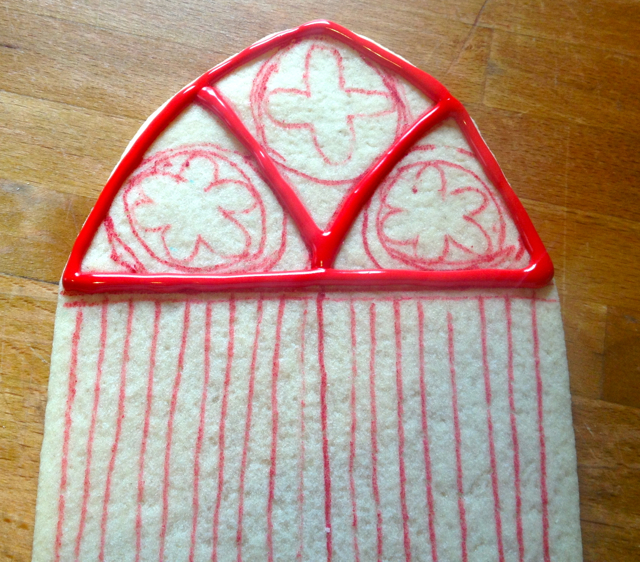
After baking the cookie I used an edible ink marker to outline my design.

Then it was time to start icing.

There are wood slats on the front of the doors so I piped straight lines with a space in between. Once the first set of lines dried I went back and added more lines for a textured look.

Looking pretty good.

I used a #1 pastry tip to add the black details.

I let the cookie dry completely before going back and adding yellow icing to the light.

I used a dab of buttercream on the back of the cookie to stick it into place.


Saturday, April 6, 2013

Completed Wedding Cake


After much dreaming, planning and baking I finally got to see the results of the wedding cake I made for my friend Nathan.

Luckily with support and encouragement from my friends and family everything turned out great and I got lots of compliments on the taste and moistness of the cake. I used the same yellow buttermilk cake recipe that I used to make my Mango Coconut Cake.

All of the decorations for the tiered cake were made of sugar cookies decorated with royal icing. My friend Anne bought beautiful yellow and green tinged roses to decorate the three additional cakes I made to help feed the large number of guests.
The doors of Trinity Episcopal Cathedral in sugar cookie.

A cake topped with roses is simple and elegant. I love the modern look of the green tinged roses.


Cakes in the car.
In addition to cake, there was punch, colorful mints, coffee and tea. Volunteers from the Wednesday Community Meal graciously served the treats and helped clean up. I have to give a special shout out to Cheryl and Cindy who cut the cake. I didn't have the nerves for it and they did a fabulous job.
I could smile and breathe after the tiered cake was successfully stacked and decorated.

Friday, April 5, 2013

Cake, Cake And More Cake

Icing the three layer cake for the base of the tiered wedding cake.

Cakes ready to be iced. Every layer was soaked with a Grand Marnier simple syrup. In between the layers is fresh strawberry puree and strawberry buttercream.
Yesterday was cake day. I made and baked 15 cakes from scratch for the wedding cake I'm making for my friend Nathan's wedding reception tomorrow.

The first cake came out of the oven at 7 a.m. and the last at 10 p.m. and along the way I learned I need more cake pans.

I have only one pan for the largest sized cake and I needed to make nine of them since the base of the tiered cake is three layers and I'm making three additional two layer cakes to help feed the large crowd that is expected. Each cake took 45 minutes to bake and 15 minutes to cool in the pan before I could get another in the oven.
Half of the cakes I made yesterday.

I also made eight batches of buttercream. Luckily I have an easy vanilla cream buttercream recipe that is great when you need to make a lot of batches because you can make the base for the buttercream in advance.


Here's the recipe:

Vanilla Cream Buttercream
1 cup milk
1 cup sugar, divided
1/2 cup heavy cream
1/3 cup cornstarch
1 1/2 tablespoons vanilla
2 cups unsalted butter, room temperature


In a saucepan over medium heat, cook the milk and half of the sugar until simmering.
In the meantime, in a small bowl combine the cream, the other half of the sugar and cornstarch. Mix well with a whisk.

When the milk is simmering,  pour about half of it into the cream mixture and whisk well. Add it back to the milk in the saucepan and heat, stirring constantly until the mixture becomes very thick.

Remove from heat and whisk in the vanilla. Put the mixture into a clean bowl and cover with plastic wrap. Let the mixture cool completely.

This buttercream base can be made in advance. Cover it with plastic wrap and let it cool completely before adding the butter.


When the buttercream base is cool, transfer it to a mixer and whip until smooth, add the butter a tablespoon at a time and whip until light and fluffy.