Sunday, April 7, 2013

Red Doors Of Trinity In Cookie


The focal point of Nathan's wedding cake were the red doors of Trinity Episcopal Cathedral made out of sugar cookie dough. 

Nathan is a priest at Trinity so I wanted to incorporate the church somehow into the design of the cake and a colorful pop of red is always a good thing.

Here's how I made them:

I sketched the design.

I cut the shape I wanted out of cardboard and then used it as a guide to cut the door out of sugar cookie dough.

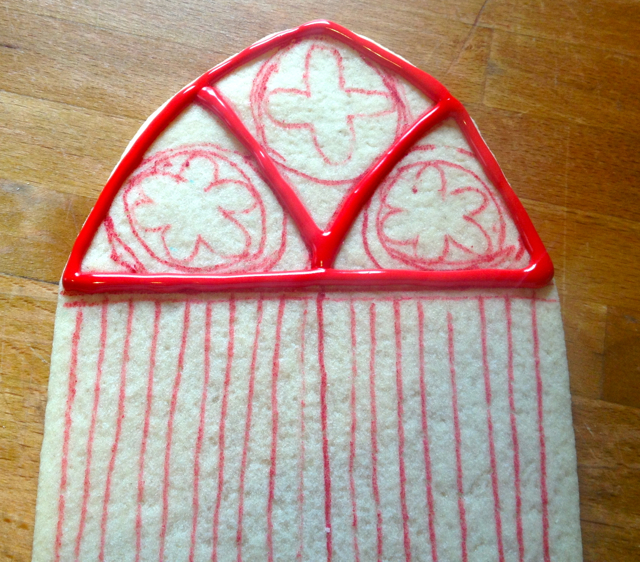
After baking the cookie I used an edible ink marker to outline my design.

Then it was time to start icing.

There are wood slats on the front of the doors so I piped straight lines with a space in between. Once the first set of lines dried I went back and added more lines for a textured look.

Looking pretty good.

I used a #1 pastry tip to add the black details.

I let the cookie dry completely before going back and adding yellow icing to the light.

I used a dab of buttercream on the back of the cookie to stick it into place.


Saturday, April 6, 2013

Completed Wedding Cake


After much dreaming, planning and baking I finally got to see the results of the wedding cake I made for my friend Nathan.

Luckily with support and encouragement from my friends and family everything turned out great and I got lots of compliments on the taste and moistness of the cake. I used the same yellow buttermilk cake recipe that I used to make my Mango Coconut Cake.

All of the decorations for the tiered cake were made of sugar cookies decorated with royal icing. My friend Anne bought beautiful yellow and green tinged roses to decorate the three additional cakes I made to help feed the large number of guests.
The doors of Trinity Episcopal Cathedral in sugar cookie.

A cake topped with roses is simple and elegant. I love the modern look of the green tinged roses.


Cakes in the car.
In addition to cake, there was punch, colorful mints, coffee and tea. Volunteers from the Wednesday Community Meal graciously served the treats and helped clean up. I have to give a special shout out to Cheryl and Cindy who cut the cake. I didn't have the nerves for it and they did a fabulous job.
I could smile and breathe after the tiered cake was successfully stacked and decorated.

Friday, April 5, 2013

Cake, Cake And More Cake

Icing the three layer cake for the base of the tiered wedding cake.

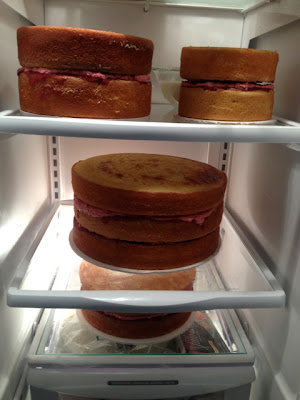
Cakes ready to be iced. Every layer was soaked with a Grand Marnier simple syrup. In between the layers is fresh strawberry puree and strawberry buttercream.
Yesterday was cake day. I made and baked 15 cakes from scratch for the wedding cake I'm making for my friend Nathan's wedding reception tomorrow.

The first cake came out of the oven at 7 a.m. and the last at 10 p.m. and along the way I learned I need more cake pans.

I have only one pan for the largest sized cake and I needed to make nine of them since the base of the tiered cake is three layers and I'm making three additional two layer cakes to help feed the large crowd that is expected. Each cake took 45 minutes to bake and 15 minutes to cool in the pan before I could get another in the oven.
Half of the cakes I made yesterday.

I also made eight batches of buttercream. Luckily I have an easy vanilla cream buttercream recipe that is great when you need to make a lot of batches because you can make the base for the buttercream in advance.


Here's the recipe:

Vanilla Cream Buttercream
1 cup milk
1 cup sugar, divided
1/2 cup heavy cream
1/3 cup cornstarch
1 1/2 tablespoons vanilla
2 cups unsalted butter, room temperature


In a saucepan over medium heat, cook the milk and half of the sugar until simmering.
In the meantime, in a small bowl combine the cream, the other half of the sugar and cornstarch. Mix well with a whisk.

When the milk is simmering,  pour about half of it into the cream mixture and whisk well. Add it back to the milk in the saucepan and heat, stirring constantly until the mixture becomes very thick.

Remove from heat and whisk in the vanilla. Put the mixture into a clean bowl and cover with plastic wrap. Let the mixture cool completely.

This buttercream base can be made in advance. Cover it with plastic wrap and let it cool completely before adding the butter.


When the buttercream base is cool, transfer it to a mixer and whip until smooth, add the butter a tablespoon at a time and whip until light and fluffy.

Thursday, April 4, 2013

Wedding Week

I'm making a wedding cake for a reception this coming Saturday so this week has been busy busy busy.

Making a wedding cake means more than just baking a cake and adding frosting. Presentation matters a lot and it takes time and careful consideration.

Without giving away too much about the design (I want Nathan to be surprised), here are a few snapshots of what I've been up to so far this week.
Monday: Making the cake decorations. Here, I'm getting ready to cut blue birds out of tinted sugar cookie dough.


Tuesday: Shopping for cake ingredients. This was what my cart looked like even before I hit the butter department.

Tuesday Night: Adding muslin fabric and ribbon to 16-inch wooden rounds that will act as cake bases. I'm making a four-tiered wedding cake and three additional two layer 14-inch cakes so I had to make four cake bases.

Wednesday: Making the fresh strawberry filling for the cake.


Wednesday, April 3, 2013

Braised Chicken

Braised chicken, rice pilaf and a roasted tomato. We served 240 meals today.

Usually when there is chicken to cook and serve at the Wednesday Community Meal, we go the universally loved crispy route - oven-baked with a crumb coating.

Today, inspired by already sliced mushrooms, containers of minced onion, celery and carrots (donated by Trader Joe's) and a can of Knorr brand white sauce, we decided to braise the chicken.

We seasoned the chicken well with fresh rosemary, garlic, salt and pepper and cooked it in a hotel pan in a 350 degree convection oven for 15 to 20 minutes until the skin began to brown. We then pulled the chicken out of the oven and gave it a few ladles of the creamy white sauce that was flecked with the vegetables.
The chicken after being coated with white sauce. It then went back into the oven to cook uncovered for 15 minutes. Then, covered with foil and cooked until done.

We put the chicken back into the oven for another 15 minutes to darken the sauce and then pulled it out of the oven once again and covered the pan with foil. The pans then went back into the oven until the chicken reached an internal temperature of 165 degrees.

The result was moist and flavorful chicken that was falling off the bone. My friend and fellow volunteer Jeff said it looked like it came from Martha Stewart.  It did look pretty great - delicious and comforting.

The guests gave us lots of compliments on the chicken which always makes us happy. No one wants to eat the same thing over and over again and we want our guests to feel satisfied.


Tuesday, April 2, 2013

Tree Cookie


Thanks to my wonderful #67 leaf tip, this tree cookie actually isn't too hard to make.

If you haven't used a leaf tip before, practice piping on a plate until you get the hang of it. The secret is to pull up as you release pressure on the pastry bag. That movement is what forms the end point of the leaf. It just takes some practice.

These trees are for the wedding cake I'm making this weekend so I "carved" the initials of the couple into the trunk of one of the trees.

Here's the steps to making them:
Make and bake tree cookies.

After you've flooded the trunk with brown and the top with green royal icing, let the cookie dry completely. Then, begin adding branches with piping consistency royal icing and a #2 tip.

Try to make the layout of the branches look natural.

With stiff icing and a #67 leaf tip, add green leaves.

Add more leaves in another color for contrast and interest.

Monday, April 1, 2013

Sandbox Cake

A three-tiered sandbox cake decorated by my niece Sylvia.

My family just returned from a four day trip to visit my parents at their home in Ellensburg, Washington.

My husband calls their house "the spa" because it's the only place for us to truly relax and recharge. My dad prepares delicious and healthy meals for us and my mom takes care of all our accommodations while we nap, go for walks and work on crossword puzzles. It's the best.

While there, I did take the time to bake a quick and easy sandbox cake with my niece Sylvia.

My mom made the small sandbox by simply filling a shallow container with a lid with play sand she purchased at the toy store. When the grandkids want to play, she puts the sandbox on a plastic sheet to catch any sand that will inevitably fall over the sides. When the kids are done, she picks up the sheet, pours back the loose sand and puts on the lid.

Here's the recipe:

Sandbox Cake
1 bucket sand
1 pitcher water
flexible containers of different sizes (cottage cheese, sour cream and yogurt containers work well)
fresh flowers for decoration

Pour the water into the sand, a little at a time, until it is very moist and holds its shape when pressed together in your hand.

Fill the containers with sand. Pat the sand down firmly with your hand.

Invert the containers one at a time and carefully and gently lift them up to release the sand cake. Decorate with flowers before serving.

My niece Sylvia and my mom with her just baked sandbox cake. She gathered the flowers and decorated the cake herself.

Sandboxes are always more fun with a friend. Avaieya helped us scoop sand and even baked a cake of her own.