Wednesday, March 12, 2014

Homemade Bread

Making bread with my friend Mary. If I look taller than usual it's because I'm standing on a stool. Kneading is easier when you are well above the dough. Thank you Cheryl for taking the picture!
I was so happy to see my friend Mary already at Trinity Episcopal Cathedral when I arrived extra early this morning set to make homemade French bread for the Wednesday Community Meal.

Making homemade bread is so much easier when you have someone to help you scoop and add flour as you get your hands sticky and gooey from mixing and kneading the dough.

Mary and I went through 50 pounds of flour today to make 45 loaves of bread and the guests really loved it. I mean who doesn't like warm homemade bread?

It is a lot of work though, and at one point today after shaping my umpteenth loaf, I asked my friends to tell me "no" the next time I said I was going to make bread from scratch for the meal.

But now that the bread has been baked and served, I take my impulsive statement back. Homemade bread is such a special treat for our guests that I truly want to make it again for them, just maybe not next week.

Oh, and I definitely will let Mary know when that will be because I don't even want to think of taking on the task without her help. She is a wonderful teammate.

We served 293 meals today.

Today's meal of spaghetti and meatballs and a thick slice of warm bread.
If you want to make a single batch of French bread, here is the recipe:


French Bread
(makes 4 loaves)
2 packages yeast
2/3 cup tepid water
1/2 teaspoon sugar
7 cups bread flour (additional may be needed)
2 tablespoons rye or whole wheat flour
4 1/2 teaspoons salt
2 cups cold water
(cornmeal for sprinkling on sheet pan or parchment paper)

Combine yeast, sugar and tepid water. Let set for 5 minutes.


Combine the remaining ingredients then add yeast mixture. Knead.

Let rise 40 to 60 minutes in a clean, dry bowl. Then deflate and punch into a 14-inch rectangle and fold into thirds.

Return dough to bowl and let rise 1 to 1 1/2 hours. Make loaves and let rise another  1 1/2 hours.

Place loaves on baking sheet sprinkled with cornmeal or lined with parchment paper, slash and place in a preheated 450 degree oven tossed with 1/4 cup of water. Bake 20 minutes and then bake an additional 10 minutes at 400 degrees.

Tuesday, March 11, 2014

Shamrock Cookies


Shamrock shaped cookies are the obvious choice when it comes to making decorated cookies for St. Patrick's Day.

The problem with them is there aren't many ways to get creative with the decorating. Solid green is kind of the only choice.

One way I've found to add interest to shamrock cookies is to decorate them in sections, letting them dry for a bit in between. This technique creates a textured effect that adds interest and dimension to the cookie. Plus, it's easy to do and you still only have to mix one color of royal icing.

Here's how:

Take your time mixing your green royal icing. Since these are a one color cookie, you want a good looking shade. I used a combination of avacado, leaf green, electric green and brown Americolors.
The pretty handle of my Grandmother Beatrice's rolling pin was the inspiration for the green color I mixed. It's always helpful to have a visual of the color you want to mix.
Using a #2 tip and flood consistency icing, outline and fill the bottom two leaf sections on every cookie. Let the icing dry for at least 20 minutes before moving on to the next step.

Now outline and fill the top leaf section of every cookie.

Finally, outline and fill the stem. Now you have a single colored cookie that's definitely not boring — so much better than flat green. Be sure to let the cookies dry completely before serving or packaging.

Monday, March 10, 2014

Irish Oven Oatcakes

An Oven Oatcake and a cup of hot tea is the perfect excuse to take a break and sit for a bit.

My husband received a grant to study International Politics at the University of Ulster in the early 90s,  so we moved to Northern Ireland and that's where our oldest daughter Ùna was born.

And, as it turned out, the simple no-fuss cuisine of the country was perfectly suited for my pregnancy.  Stews, boiled potatoes, soda bread and fish 'n' chips satisfied my cravings and Irish Oven Oatcakes settled my stomach.

As soon as we were situated in our little apartment on the University of Ulster's Coleraine campus, we ventured into town and I made my first purchase, a mini photo-filled cookbook called "Step By Step Irish Farmhouse Cooking."
My favorite little Irish cookbook.

That 64-page cookbook was and still is so dear to me. I enjoy looking at the pictures, deciding what to make and shopping for ingredients.

Today, more than 20-years later, I continue to regularly make my four favorite recipes from the book — Guinness Beef Stew, Irish Soda Bread, Irish Potato Scones and Oven Oatcakes.

With the damp and blustery Irish-like weather we've been having lately in Portland, the Oven Oatcakes are just the thing to make. Oatcakes are buttery, lightly sweet and the perfect excuse to sit for a bit, relax and enjoy a good cup of hot tea.

Here's the recipe:

Oven Oatcakes
(makes 16)
2 cups fine ground oatmeal
(Note: In Ireland it was easy to find ground oatmeal in the supermarket. Here, you can buy Bob's Redmill Oat Flour or just grind old-fashioned oats yourself using a food processor)
1 cup plain flour
1/2 teaspoon baking soda
1/4 cup sugar
6 oz. butter, melted

Preheat the oven to 400 degrees and lightly grease or line a baking sheet with parchment paper.

If you can't find ground oatmeal in the store, just make it yourself by grinding old-fashioned rolled oats in a food processor.

In a large bowl, combine the ground oatmeal, flour, baking soda and sugar. Add the melted butter and stir until a soft dough forms.

Add the melted butter to the ground oats, flour, baking soda and sugar.

Mix just until a soft dough forms.
Place the dough on a piece of parchment or wax paper and pat it into a square shape. Use a rolling pin to make the square larger and 1/4 -inch thick. Use a bench scraper or edge of a large knife to keep the sides and corners square.
Set the dough on wax paper or parchment and pat it to form a square.

Use a rolling pin to get the dough 1/4 of an inch thick and keep the sides and corners square by using a bench scraper or large knife to shape the edges.

Cut the large square into 16 even-sized oatcakes and prick each three times with a fork. Use a spatula to transfer the oatcakes to the prepared baking sheet and bake for 15 minutes until golden and crisp.
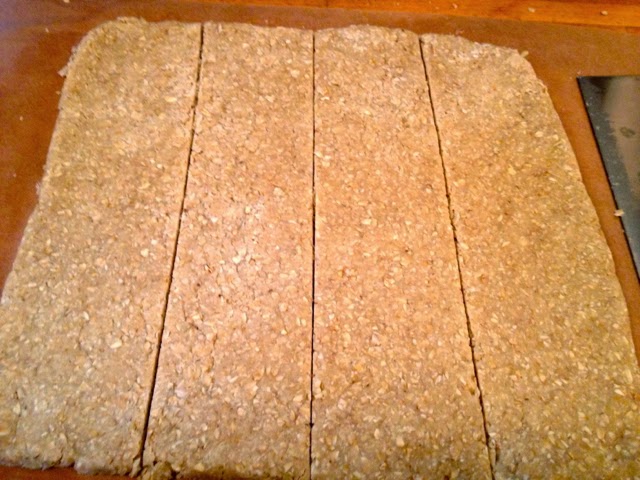
Cut the dough in half and then quarters. Repeat this horizontally to get 16 even sized oatcakes.

Use a fork to prick each oatcake three times.

Place the oatcakes on the prepared sheetpan and bake for 15 minutes at 400 degrees.

The finished oatcakes should be crisp and golden brown.

A stack of Oven Oatcakes ready to be enjoyed with cups of hot tea.


Thursday, March 6, 2014

Frozen Lemon Squares


Frozen Lemon Squares are the thing to make when you want to serve a dessert that's homemade and out of the ordinary yet easy.

The dessert can be made days in advance and left in the freezer until you are ready to serve. Just be sure to let it set for at least 10 minutes at room temperature before cutting and serving. It's even better if you bake the dessert in a parchment-lined pan and extend the parchment paper over two of the sides so that you can lift it completely out of the pan to slice.

This parchment recommendation comes from experience — I had a tough time slicing through the crust using just the tip of a knife.

If you want to get a little fancy, a spoonful of lightly sweetened fresh berries is a nice addition.

Here's how to make this tart and sweet treat that's sure to please:

Frozen Lemon Squares
(serves 6 to 9)

Crust:
3/4 cup unsalted butter, softened
1/2 teaspoon sea salt
1/2 teaspoon vanilla
1/3 cup confectioners sugar
1 1/2 cup flour

Preheat oven to 350 degrees. Set aside a 9-inch square pan. It's helpful to also line the pan with parchment paper that extends over two of the sides so that you can lift the dessert right out of the pan after baking and freezing.

In a large bowl cream together the butter, salt, sugar and vanilla until light and fluffy. Add the flour and mix just until combined and a soft dough forms.

Press the dough evenly into the bottom of the pan and bake for 15 minutes. In the meantime, prepare the filling.
Add the dough to the pan.

Press the dough evenly on the bottom and bake at 350 degrees for 15 minutes.

Filling:
1 (14-ounce) can sweetened condensed milk
3 egg yolks
1/2 cup lemon juice from concentrate
drop of yellow food coloring (optional)

Reduce oven temperature to 325 degrees. Mix together all of the filling ingredients until thoroughly combined and smooth. Pour evenly over the pre-baked crust and bake for 30 minutes. Let cool completely at room temperature before assembling and freezing.
Mix together all of the filling ingredients.

Have your pre-baked crust ready.

Pour the filling over the crust and bake at 325 degrees for 30 minutes.


Let the dessert cool completely at room temperature before adding the whipped cream layer and freezing.
To Assemble:
3 cups lightly sweetened whipped cream

When the dessert is completely cool, spread the whipped cream evenly over the top of the lemon layer. Cover with plastic wrap and freeze for 4 to 6 hours or until firm. Keep the dessert in the freezer until you are ready to serve. Let stand at room temperature before slicing.

When the dessert has cooled at room temperature, top with the whipped cream, cover with plastic wrap and freeze for 4 to 6 hours or until firm.


Wednesday, March 5, 2014

A Quiet Day And A Surprise Treat

Today was a quiet day at the Wednesday Community Meal. My best guess is that this was due in part to the miserable rainy weather that no one wants to be out in and that it's the first week of the month when people have received their social security benefit checks.

There was actually one point during the service, a little after noon,  that the kitchen came to a complete standstill and I was able to snap a picture to document the rare occasion.
Hard working volunteers Davis, Rieko, Karen and Carolyn with nothing to do for a brief moment.

In the end we served 269 meals of roasted chicken, carmelized carrots and baked potatoes. The potatoes were topped with butter and creme fraiche that was donated by The Oregon Foodbank. And of course, there was also hot soup, salad and dessert.
We served caramelized carrots seasoned with sage, garlic, salt and black pepper alongside chicken and baked potatoes.

There was also a surprise treat courtesy of Olympic Provisions - an assortment of dry cured salami that we handed out to our guests as they left.
A selection of gourmet dry cured salami donated by Olympic Provisions.

The high end salami was a delicious way to say "thank you" to those who trekked in the heavy rain to get to the meal.

According to Saveur Magazine, "Portland, Oregon's Olympic Provisions makes some of the finest charcuterie we've tasted, from regional variations on Spanish chorizo to French Saucissons to Italian soppressate."

What a special treat for our wonderful guests! Thank you Olympic Provisions!

Tuesday, March 4, 2014

Tempered Chocolate Decorations


Before

After
A plain cheesecake can be suddenly transformed into a glamorous beauty with just a random spatteringings of melted chocolate.

It's important though to melt chocolate the right way so that the decorations you create are as pretty as possible - even colored, smooth and snappy. In other words, tempered.

Untempered chocolate is not attractive, and may suffer from a number of problems. It may not set up hard (tempered chocolate snaps when you break it),  look dull and blotchy and/or have fat bloom which means the fat in the chocolate will move to the surface and cause whitish streaks and blotches.

And, what's the point of a chocolate decoration if it does this? Chocolate that is front and center needs to be tempered and this can be done without using a tempering machine or thermometers.

Tempering is simply encouraging the cocoa butter to harden into a specific crystalline pattern so that it maintains its sheen and texture. The best way I've found to do this is by adding a small amount of solid tempered chocolate to the melted chocolate. The technical name for this tempering method is called "seeding."

Simply melt chocolate using a microwave (heat in 30-second intervals, stirring after each) or in a double boiler over simmering not boiling water. If you use a double boiler know that it is essential that not a single drop of water get into your melted chocolate. Water ruins melted chocolate by causing it to seize and go grainy.

Once the chocolate is melted, add a small amount of solid chocolate (1/3 of the melted quantity is the general rule) to it and stir until melted. Now your chocolate is tempered and ready to use to decorate desserts.

To decorate the cheesecake, I melted 6 tablespoons of Callebaut dark chocolate chips in the microwave and added 2 tablespoons of "seed" chocolate for tempering.

Here's how:
Get your dessert ready. I put pieces of foil around the cheesecake to catch chocolate spills.

Put 6 tablespoons of dark chocolate in one bowl and 2 tablespoons of dark chocolate in a second bowl.

Heat the 6 tablespoons in a microwave for 30 seconds and stir.

After another 30 seconds of heating, stir again. It obviously needs another 30 seconds of heating.

The chocolate is now completely melted.

Add the 2 tablespoons of chocolate to the melted chocolate.

Keep stirring until all the chocolate is melted and smooth.

It's almost there. I still see a few bits of solid chocolate.

Done. The chocolate is completely smooth and ready to drizzle on the cheesecake.

Quickly move a spoonful of chocolate back and forth over the cheesecake.

Aesthetically I should have been more careful about the big chocolate blobs that fell onto the cake but I don't think the eaters will mind. I've never heard anyone complain about too much chocolate. In the picture you can see that  thin chocolate lines have already set up. The thicker lines will take a bit longer.


Done. Using the "seeding" method to temper the chocolate makes for an even colored, smooth and snappy chocolate decoration.


Sunday, March 2, 2014

Mini Cheesecakes

One recipe makes 60 mini cheesecakes. Serve them as is or add your choice of toppings like a dollop of lemon curd, chocolate or sweetened strawberries.

These mini cheesecakes are perfect for a potluck or party. Just be sure to bake them a day in advance so that they have plenty of time to chill before serving.

They taste delicious as is but look especially nice with pretty toppings like a drizzle of melted chocolate, lemon curd, sweetened diced strawberries or cherry pie filling.

Mini cheesecakes topped with melted chocolate and chopped Reeses Peanut Butter Cups. These may look fancy but they are so easy to make.

If you would rather make one large cheesecake, use a 10-inch nonstick springform pan and increase the baking time to one hour.

Here's the recipe:

Mini Cheesecakes
(makes 60)
2 1/2 cups graham cracker or vanilla wafer crumbs
1/2 cup sugar
2/3 cup butter, melted
2 (8 oz) packages cream cheese, softenened
1 (14 oz) can sweetened condensed milk
4 large eggs
2 tablespoons flour
1/4 cup lemon juice
1 teaspoon vanilla

Preheat oven to 300 degrees.

Line 60 mini muffin cups with paper liners.

In a medium sized bowl mix the graham cracker or vanilla wafer crumbs with the sugar and melted butter. Press a teaspoon of this mixture into the bottom of each of the mini muffin cups.

Whip the cream cheese until smooth. Gradually add the sweetened condensed milk and whip again until smooth.

In a small bowl combine the eggs, flour, lemon juice and vanilla. Whisk until smooth. Add the egg mixture to the cream cheese mixture and whip again until smooth and well combined.

Fill each of the muffin cups with cream cheese filling.

Bake for 16 to 20 minutes or until the center of each cheesecake is set.

Let the cheesecakes cool at room temperature for one hour and then chill in the refrigerator for at least 4 hours before removing from the papers and serving with your choice of toppings.


Topping ideas:

Melted chocolate drizzle and chopped peanut butter cups

Sweetened diced strawberries

A dollop of lemon curd and a fresh raspberry

Cherry pie filling